Wednesday, December 16, 2009

Teacher holiday gifts

It's that time of year again - when crafters everywhere try to figure out a way to make something beautiful and memorable to give to their kids' teachers. I love to give bookstore gift cards, as I've never met a teacher who doesn't love books. But I'm always looking for a clever way to package them. I also love to bake, so this year I decided to combine a home-baked treat with a gift card holder. Here's the outside:


And here's what's inside:


The flat part of the staples are covered on the front by the strip of red paper, but the bent ends are exposed on the back. I left them showing on the back so that the teachers could open them with a staple remover and not destroy the topper if they so desired. The gift card is held in very simply by a couple of punches with my slit punch. Two little half moons of the gift card also show on the back of the topper, which will hopefully give the recipients a clue that they should go ahead and open the package! Rather than use up precious buttons for the gingerbread boys, I used a little circle stamp instead. The cookies are gingersnaps.

Details: stamps  Holiday Button Bits, Polka Dot Basics; paper - Vintage Cream, Bitty Box Basics; ink - Pure Poppy, Close to Cocoa (Stampin' Up!); accessories - Top Note die (Sizzix for SU!), slit punch (SU!)

Thursday, August 6, 2009

Birthday card for hubby

Today is hubby's birthday, and it just wouldn't be acceptable to get a store-bought card, or worse, no card at all, right? So here's what I made for him. I took my inspiration from this fabulous card by Becky Oehlers.

Details: stamps - Birthday Basics; paper - Ruby Red (Stampin' Up!), Boxer (Basic Grey), Vintage Cream; ink - Night of Navy (SU!); accessories - Nestabilities stars (Spellbinders), rustic wood buttons, rustic twine

Saturday, July 4, 2009

Fathers Day card, and another "stamping" friend

I'm a little late getting around to showing you this, but here's my Father's Day card that I sent to my dad. I wanted to make some background paper using the compass rose image from Father Knows Best. The Guidelines 2 paper made it very easy to do. I looked through a lot of sets to find images to use - the compass rose and the small brown concentric circles are from Father Knows Best; the large green medallion is from Simple Little Things (2008 anniversary set); and the green bars are from Simply Stationery.

Details: stamps - Father Knows Best, Simple Little Things, Simply Stationery; paper - Guidelines 2, Ripe Avocado, Dark Chocolate; ink - Ripe Avocado, Dark Chocolate; accessories - dark chocolate twill ribbon, key tag punch and horizontal slot punch (Stampin' Up!)

Remember I mentioned in my last post that my daughters were members in my craft room? Here's another member. This is Tom:

Tom is a two year old parakeet who lives in my craft room. Tom thinks he should be allowed to play with my craft things. What do you think?

I have no idea what's so fascinating about these monster paper punches, but Tom will play with them for hours. He noses around them for a long time, then tries to get on top of them. But they're smooth and he can't get a good foothold, so he slides off and flies away, only to come right back and try again.

If he'd fall in love with a tool that was more his size, he might be a useful contributor!

Thursday, June 11, 2009

I have new stamping partners!

A very happy milestone has been reached in our house. My daughters are now full "members" in my craft room. They've both proven that they're able to take good care of all of the toys in there, so I've given them permission to make things pretty much whenever they like. It's interesting to see what they choose to use. Juliette, 11, is drawn toward coloring on stamps with markers to achieve multi-colored looks. Katrina, 9, has been practicing with Copic markers. Both of them love the Elzybells girls and the Chichiboulies from Stamping Bella.

Here is a poster that Katrina made. I love her Copic coloring. I haven't given her any instruction at all. She's learned by watching and by doing.

Sunday, June 7, 2009

I bow to Bakerella!

So, if you're not a food blogger, do your baking adventures belong on your stamping blog or on your crochet blog? Hmm. I say they go here. I've been a regular reader of Bakerella's blog for some time now. I love to bake, but have never had the guts to try to make her super-adorable creations before. Today seemed like the day. So I rounded up my nine-year-old daughter, and we went to work. We were using the Cupcake Bites Made Easy recipe.

We certainly have a lot of practice to do before we can make things as gorgeous as Bakerella makes, but we had a great time!

Lots of fun supplies were gathered.

We got messy rolling up balls of cake.

We filled our candy mold with candy melts and sunk the cake balls into the candy.

We dunked the tops of the cake balls into a second color of candy melts and topped them with sprinkles.

This recipe makes a lot of cupcake bites!

This is the most beautiful of the cupcake bites that I could find to photograph.

Monday, June 1, 2009

Fun stamping day with nearly 50 of my online buddies!

Last Saturday was the annual North Texas Stamping Day. We have a big shoebox swap every spring. Each person creates a stamping project and brings all of the supplies prepared for each person to make their project. We spend the day moving from one project to the next, creating beautiful things without the pressure of having to design them all ourselves. It's a great way to get new ideas. And of course it's also just a ton of fun to meet so many people who share a common interest.

This is my project for the swap. I borrowed the design from Joan Bardee. Check out her beautiful card here.

Details: stamps - Friends Til the End (PTI), Friendly Words jumbo wheel (SU - my wheel is cut up into separate stamps); paper - Gina K pure luxury 120 lb. ivory, true black (PTI); ink - pure poppy, true black (PTI); accessories - scallop edge punch, black button (PTI), hemp twine

This was the door prize that I donated. It holds two stamp sets. I don't have a template for this - it was a last minute kind of thing. I based it on designs that I've seen that are meant to hold cards in the two side boxes/pouches. I measured my stamp set boxes and sized the pieces accordingly.


Details: stamps - Beautiful Blooms, Friends Til the End (PTI); paper - lemon tart, spring moss, stampers select white, green tea leaves (PTI); ink - pure poppy, spring moss, true black (PTI); accessories - oval and scallop oval mega punches, spring moss grosgrain ribbon, jumbo eyelets, scor-tape

Friday, May 15, 2009

Some spring gifts

Here are some fun things I've made this month. I borrowed Dawn McVey's fabulous design for these Mothers Day cards. I used the same papers for both cards, but reversed the colors, which was a great way to get the most use out of the 8x8 papers.


Details: stamps - Mother; paper - All Fall (Fancy Pants); ink - dark chocolate; accessories - scallop edge punch (Stampin' Up!), Beautiful Butterflies die (Sizzix for SU!), new leaf button

And here are some little gifts that I made for Teacher Appreciation Week at the girls' school. The sweet little box is from one of Lauren Meader's My Timeless Templates. This template is called Rounded Wrap Up. Super quick and super cute! Inside is a handful of chocolates and several of the little iced tea packets that are meant to be shaken up in your water bottle.


Details: stamps - Seeing Stars (Verve Stamps), Thankful Blossoms (Verve Stamps); paper - kraft, pure poppy, ripe avocado, plum pudding, stampers select white, bitty dots basics; ink - true black, pure poppy, ripe avocado, plum pudding; accessories - Nestabilities ovals (Spellbinders), word window punch (SU), ribbon

Saturday, May 2, 2009

Fun with markers

I've been practicing more with my Copic coloring. I have thousands of stamps, but not a lot of them are "coloring" images (yet). Here are some sweet little chicks from Elzybells. I was mainly trying to concentrate on where the sun was shining on them (I hope it's obvious that my sun is in the top left corner). I really like how the shading came out on the pink/purple egg and on the chicks. I still need more practice, but I'm very happy with the things we're learning in Colleen's class.


I am amazed at how many markers you can use to get a nicely shaded picture. I used 26 different Copics for this image. I even took a picture. Enjoy, because it's unlikely that I'll be organized enough to show them regularly!


Monday, April 20, 2009

Coloring for grownups

I'm taking an online class on coloring. No, really. There are these cool markers called Copics, and you can do lots of great things with them, but there is a learning curve. In an effort to move up the curve a little faster, I signed up for a class taught by Colleen Schaan. So far it's a lot of fun. We have homework and things to practice, plus a place to post our samples and discuss what we're learning. Here's a little sample of what I've been doing today.

I realized after I uploaded this photo that I wrote down the wrong colors on the top butterfly. It should be "YR" instead of "Y" on all three colors for that one.

I'm looking forward to seeing what other new tricks Colleen will be teaching us.

Sunday, April 5, 2009

Hubby's (accidental) color challenge

Conversation in our car while driving yesterday:

DD age 8: I want to get a new Frisbee. I need a teal one because pink might not always be my favorite color.

Me: Maybe you need one of every color in the world, just in case your new favorite color isn't teal.

DH: (rolls eyes)

Me: Oh, yeah, I'm the one who needs things in every single color. Especially craft stuff.

DH: And yet, you don't use every single color in one project, do you?

Me: (thinking, "Hmm, he's got a point. I wonder if I could?")

So with that, my DH's color challenge was on. He was blissfully unaware of the challenge, so I was able to focus on how in the world I could get every color into one project. The result:

This will hang on the wall in my craft room. I love the way it turned out! I think this could be my mantra.

Details: Stamps - Fresh Alphabet (PTI) - the word "color" is stamped, the remainder was printed on the computer; paper - 91 different solid colors of cardstock (SU! and PTI); accessories - 6x12 picture frame, 1/2" circle punch

Thursday, March 19, 2009

New toys!

Wow, I think I have a new favorite stamp set! Guide Lines Two is just fabulous. This set has lots of interesting geometric pieces for building your own backgrounds. The design starts with a grid of lines and circles. Then you add the various medallion-type stamps, using the grid as a guide. All of the medallions have nice little features that make them easy to line up. I stamped a full sheet of this background, with color selection help from my eight-year-old daughter. I still have enough of it to make at least a few more cards. Very fun! I can't wait to make some more backgrounds in different colors and patterns.

Details: stamps -Guide Lines Two, Everyday Classics; paper - Hibiscus Burst, Spring Moss, White; ink - Hibiscus Burst, Plum Pudding, Summer Sunrise, Spring Moss; accessories - Plum Pudding satin ribbon


Details: stamps - Guide Lines Two. Heart Prints Sentiments; paper - Hibiscus Burst, Summer Sunrise, White; ink - Hibiscus Burst, Plum Pudding, Summer Sunrise, Spring Moss; accessories - Plum Pudding satin ribbon, Summer Sunrise swiss dot satin ribbon, Spring Moss grosgrain ribbon, Hibiscus Burst twill ribbon, Nestabilities classic circles

Tuesday, February 17, 2009

Wow, that's a lot of paper!

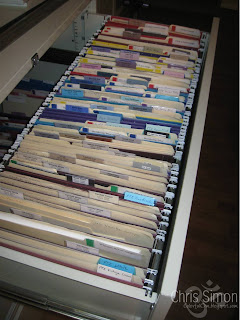
I'm sure that most if not all papercrafters have the same problem - what to do with the tons (literally!) of paper we accumulate. My solution for 8.5 x 11 cardstock was a couple of Cropper Hopper totes on wheels. This was working okay when all I had was Stampin' Up! cardstock. But as I accumulated more paper from other companies, my storage system began to fail me. And my 12 x 12 paper really needed a new place to be, as well. The Cropper Hopper totes can be used for 12 x 12, so I set out to find a new way to store my 8.5 x 11. I checked on Craigslist to see if there were any file cabinets available that would fit my needs. I was surprised and thrilled to discover that one of the thrift-type stores that I've driven by countless times is actually completely dedicated to donated office furniture, and their sales benefit a local children's hospital. I went to check it out and found row upon row of filing cabinets. Look what I got! A three drawer lateral cabinet, which holds way more paper than I currently have (one drawer is still empty). It's also the perfect height for my paper cutter and Big Shot.


Wednesday, February 11, 2009

Christmas in February?

This card was created from a sketch. I don't use sketches much, but I enjoyed working with this one.

While looking for a stamp to use instead of the flower I don't have (yet), I came upon the Snowflake Serenade set, and thought the snowflake would stand in nicely for the flower. So I made a few Christmas cards. Never too early to get started, right?

You can check out the sketch I used, and see how I modified it to use the supplies I had on hand. I didn't have the ribbon that Nichole used, but I had a different ribbon of the right color. I only had clear buttons, so I embossed a little snowflake on the button to keep it from blending in quite so much. I also used silver cord instead of twine, and decided not to do any sewing on my card.


Details: stamps - Snowflake Serenade, Holiday Treats (the tiny snowflake on the button), Holiday Wishes, Silent Night; paper - Vintage Cream, Ripe Avocado; ink - Vintage Cream, Ripe Avocado; accessories - slit punch, 1" circle punch, ripe avocado dotted satin ribbon, clear button, clear embossing powder, silver cord

Saturday, February 7, 2009

A very dotty card


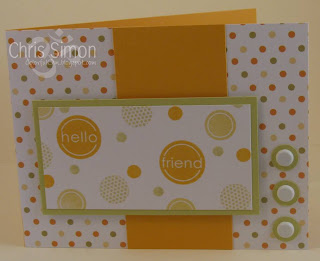
Details: stamps - Floral Frenzy; ink - Summer Sunrise, Spring Moss, So Saffron (SU!); paper - stampers select white, summer sunrise, spring moss, polka dot parade; accessories - 1/2" circle punch (SU!), 5/16" neutral brads (SU!)

Friday, February 6, 2009

Valentine treat bags

These valentine treat bags are for to my two daughters. Of course, we have to be fair and make them very similar. But since the girls have very different likes and dislikes, it's easy to tell whose is whose. Katrina is all about pink and blingy things. So the bag on the left with its flowery hearts, eyelet border punched edge and yummy raspberry fizz colors is for her. Juliette is much more of a tomboy, so the red polka dots, less frilly border bag is for her. Filled with chocolate hearts, I think they'll be a hit.


Details: stamps - Heart Prints, Around & About Sentiments; ink - raspberry fizz, pure poppy; paper - stampers select white, true black, raspberry fizz, pure poppy; accessories - eyelet border punch (SU!), scallop border punch (SU!), large heart punch, small white coffee bags

Thursday, January 29, 2009

Same image, two very different cards

Interesting stamping session tonight. I was playing with this gorgeous tree stamp from the new Stampin' Up! set Thoughts & Prayers. I inked it up with a big handful of SU! markers (chocolate chip plus several different greens) and stamped it a couple of times. I really liked the way it looked, so I started playing around to see what kind of cards they wanted to be. I ended up with two very different cards, one more masculine and one more feminine, using almost all of the same basic supplies. Very small changes, such as the mat color, knot versus bow, and font made a big difference in the overall feel of the cards. I think I like the masculine one best. What do you think?


Details: stamps - Thoughts & Prayers (Stampin' Up!), Birthday Basics; paper - Aqua Mist, Figgy Pudding (Basic Grey); ink - dark chocolate, markers (SU!); accessories - ripe avocado twill ribbon, 5/16" neutral brads (SU!)


Details: stamps - Thoughts & Prayers (Stampin' Up!), Birthday Basics; paper - Aqua Mist, Figgy Pudding (Basic Grey); ink - dark chocolate, aqua mist, markers (SU!); accessories - aqua mist twill ribbon, eyelet border punch (SU!)

Tuesday, January 13, 2009

Look ma, no red!

Can you believe it? I finally made a card with no red paper or ink! I have been seeing photos of these Top Note die quilts for the past week or so, and decided to try it out for myself today. It's not difficult at all. Just cut a piece of scrap paper (I used regular computer paper) 3 3/4" by 5". Then punch twelve pieces of patterned paper with a 1 1/4" square punch - or you could cut them with your paper cutter. Glue the pieces down to the scrap, then run the resulting quilt through your die cutter with the Top Note die. It doesn't take long to do, and it's a real wow!


Details: stamps - Quilter's Sampler; paper - barely banana (Stampin' Up!), vintage cream, Urban Prairie (Basic Grey); ink - regal rose (Stampin' Up!); accessories - 1 1/4" square punch, horizontal slot punch (SU!), corner rounder punch (SU!), Top Note die (Sizzix for SU!), vintage brads (SU!), summer sunrise twill ribbon, dimensionals

What have you done with your life?

Saw this on Shannan's blog this morning and thought I'd play along. All of the bolded lines are things that I've done in my life. Want to play too? Just copy the list to your blog and bold your experiences instead of mine. And link back so that I can see your list!

1. Started your own blog

2. Slept under the stars
3. Played in a band
4. Visited Hawaii
5. Watched a meteor shower
6. Given more than you can afford to charity
7. Been to Disneyland/world
8. Climbed a mountain
9. Held a praying mantis
10. Sang a solo
11. Bungee jumped
12. Visited Paris
13. Watched a lightning storm at sea
14. Taught yourself an art from scratch
15. Adopted a child
16. Had food poisoning
17. Walked to the top of the Statue of Liberty
18. Grown your own vegetables
19. Seen the Mona Lisa in France
20. Slept on an overnight train

21. Had a pillow fight
22. Hitch hiked
23. Taken a sick day when you’re not ill
24. Built a snow fort
25. Held a lamb
26. Gone skinny dipping
27. Run a Marathon
28. Ridden in a gondola in Venice
29. Seen a total eclipse
30. Watched a sunrise or sunset
31. Hit a home run
32. Been on a cruise
33. Seen Niagara Falls in person
34. Visited the birthplace of your ancestors
35. Seen an Amish community
36. Taught yourself a new language
37. Had enough money to be truly satisfied
38. Seen the Leaning Tower of Pisa in person
39. Gone rock climbing
40. Seen Michelangelo’s David
41. Sung karaoke
42. Seen Old Faithful geyser erupt
43. Bought a stranger a meal at a restaurant
44. Visited Africa
45. Walked on a beach by moonlight
46. Been transported in an ambulance
47. Had your portrait painted
48. Gone deep sea fishing
49. Seen the Sistine Chapel in person
50. Been to the top of the Eiffel Tower in Paris
51. Gone scuba diving or snorkeling
52. Kissed in the rain
53. Played in the mud
54. Gone to a drive-in theater
55. Been in a movie
56. Visited the Great Wall of China
57. Started a business
58. Taken a martial arts class
59. Visited Russia
60. Served at a soup kitchen
61. Sold Girl Scout Cookies
62. Gone whale watching
63. Gotten flowers for no reason
64. Donated blood, platelets or plasma
65. Gone sky diving
66. Visited a Nazi Concentration Camp
67. Bounced a check
68. Flown in a helicopter
69. Saved a favorite childhood toy
70. Visited the Lincoln Memorial
71. Eaten Caviar

72. Pieced a quilt

73. Stood in Times Square
74. Toured the Everglades
75. Been fired from a job
76. Seen the Changing of the Guards in London
77. Broken a bone
78. Been on a speeding motorcycle
79. Seen the Grand Canyon in person
80. Published a book

81. Visited the Vatican
82. Bought a brand new car
83. Walked in Jerusalem
84. Had your picture in the newspaper
85. Read the entire Bible
86. Visited the White House
87. Killed and prepared an animal for eating
88. Had chickenpox
89. Saved someone’s life
90. Sat on a jury
91. Met someone famous
92. Joined a book club
93. Lost a loved one
94. Had a baby
95. Seen the Alamo in person
96. Swam in the Great Salt Lake
97. Been involved in a law suit
98. Owned a cell phone
99. Been stung by a bee

Saturday, January 10, 2009

Two little lovebirds sitting in a tree

Well, no tree, but aren't these little birds adorable? When my order from The Cat's Pajamas arrived a couple of days ago, these birds in the Puppy Love set immediately caught my interest. I paper pieced the birds using two of the papers in the Basic Grey Eva 6x6 pad, which is also where I got the super-cool dotted paper at the bottom of the card.


Details: stamps -Puppy Love (The Cat's Pajamas), Mailbox Greetings; paper - rose red, kiwi kiss (Stampin' Up!), vintage cream, Eva (Basic Grey); ink - Memento Tuxedo Black (Tsukineko), Copic markers - R29 for the hearts and YR09 for the birds' beaks; accessories - 1 3/4" circle punch, scallop circle Nestabilities, kiwi/vanilla satin ribbon (Stampin' Up!)

Here's a fun use of some of my supplies that we came upon at our house recently. We have four identical mp3 players, one for each member of the family. We were looking for a way to distinguish them from one another. Enter my stash of rub-ons from Stampin' Up!

I got out a bunch of different packages of rub-ons and gave everyone their choice. We decorated the backs of our players and now they are all easy to tell apart! Here's mine:

Friday, January 2, 2009

Birthday girl

Today is my older daughter's birthday. I can hardly believe that she's eleven years old! We had a wonderful day. Juliette decided that we should eat dinner at Cold Stone Creamery, which serves only ice cream. So the girls both had ice cream for dinner and then cake at home for dessert. I'm pretty sure they'll be starving at breakfast time. But birthdays only come once a year, so the sugar high was well-earned. Darrell and I opted to skip the ice cream and have some actual dinner before our cake. We also went along with Juliette to the local game store, where she spent all of her birthday money on game cartridges for her Nintendo DS. She's a very happy kid tonight.

Here's the birthday girl, crooked ponytails and all.

And here she is at about 16 months old. She's always been a cutie.

And here is her birthday card. Juliette loves cats and black is her favorite color at the moment. She can purr just like a cat, so the sentiment on this was "purr-fect"!


Details: stamps - Cats (Inkadinkado); paper - ruby red, basic black (Stampin' Up!), white, Scarlet's Letter (Basic Grey); ink - ruby red (SU); accessories - Nestabilities - classic rectangles and classic scalloped rectangles.

Thursday, January 1, 2009

Moving on to non-holiday stamps

I don't know about you, but I'm ready to leave the Christmas stamps alone for awhile! I got in the mood to make something bright and floral today. I was born and raised in Kansas, and am partial to sunflowers, which are the state flower. The Floral Frenzy set makes really great sunflowers! I stamped a few panels of flowers, then figured out what to do with them after I was done. I'm really happy with the nice variety of cards that I ended up with.

The following supplies were used for all five cards: stamps - Floral Frenzy; paper - vintage cream, pure poppy, summer sunshine, ripe avocado, dark chocolate; ink - pure poppy, summer sunshine, ripe avocado, chocolate chip (Stampin' Up!). Other supplies used are listed under each card.

Additional details for this card: stamps - Thankful Blossoms (Verve Stamps); ribbon - ripe avocado polka dot satin, Cuttlebug Embossing folder - swiss dot


Additional details for this card: stamps - A Little Somethin' (Stampin' Up!); ribbon - ripe avocado polka dot satin, 1 3/4" circle punch (Stampin' Up!), Nestabilities - classic scalloped circles

Additional details for this card: stamps - Thank You Kindly (Stampin' Up!); Cuttlebug Embossing folder - diamonds in the rough; scallop edge punch (Stampin' Up!)

Additional details for this card: stamps - Thankful Blossoms (Verve Stamps); scallop edge punch (Stampin' Up!)


Additional details for this card: stamps - Thank You (Green Grass Stamps); ribbon - pure poppy polka dot satin, Cuttlebug Embossing folder - textile texture

I want to show you a peek into my index book. I don't index every single stamp I have, but I have started to stamp various categories, especially sentiment stamps. This makes it so easy to find the right size or shape of words to fit the space I need to fill. This is one of the "thank you" pages in my book. Under each stamp, you can see that I've handwritten a code, such as V21. Each of my stamp sets has a code on the spine of the CD case. All of the "V" codes are for Verve Stamps, the "S" for Stampin' Up!, and so on.

Here's the spine of one of my CD cases. You can see the "P8" label, which corresponds to the codes in the index book

Here's the CD rack holding my stamps.