Friday, January 20, 2012

Colorful tree

Last weekend, I went on my first scrapbooking retreat. I’m not a scrapper, but I was eager to go and work on my cards. It was a wonderful experience for me. Since I took a limited amount of supplies, I was forced to be creative with colors and designs. In addition, the bed and breakfast where we stayed was having some issues with their internet router, so we didn’t have a lot of opportunities to check Pinterest and other sites for ideas. Rather than worry about that, I kept myself busy playing with my stamps, and came away with a stack of new cards, which makes me very happy.

IMG_0293

This is one of my favorite cards from the weekend. I love the colors on the little tree and the ground created using the Bitty Box Basics paper. With my new stamp organization – separated by category rather than stamp set – all of the plain round stamps are together and mostly lined up in size order, which made finding just the right size dot for the tree super simple.
I have lots more cards to show you from the retreat, so hopefully you will see a flurry of posts from me in the coming days!

Details: stamps – Tiny Giggle Grove (Unity), Birthday Bash Sentiments, Dot Spot; paper – White, Bitty Box Basics; ink – Chocolate Chip (Stampin’ Up), various Memento dye ink colors

Thursday, January 19, 2012

Stamp reorganization progress report #2


Today was an exciting day in the reorganization of my stamps. I’ve been steadily moving the stamps from their former homes in CD cases to their new places in the Tim Holtz unmounted stamp envelopes, and I needed some more of the DVD boxes that I’m using to hold the envelopes. I’ve had four of the boxes lined up at one end of my stamping table, and I love the convenience of having them right at my fingertips. I wanted a shelf directly above the table so that I could line up four more boxes there.

IMG_0290

Off I went to the Container Store, which is tied with IKEA as probably my all-time most dangerous places to shop! After conferring with one of their most amazingly helpful salespeople, I decided on a free-standing Elfa unit. It’s been about 20 years since I installed any Elfa shelves, and boy, have they improved since then! This unit is 36 inches wide and seven feet tall, and I built it in under an hour, with very little frustration and zero bad words! It doesn’t attach to the wall in any way, but is very stable due to its nice long “feet”. It’s easy to move the shelves around any way I want, and I can easily add more shelves or drawers if I want to in the future. I can also add another runner to either or both sides and continue to grow the unit. If I had a big enough room, I could even move it out in the center and add on to the other side! Best of all, I got it during the annual Elfa 30% off sale.

I was able to fit my stamping table (BJURSTA square slide-out leaf dining table from IKEA) right up under the shelves on the Elfa unit. My table is 35 inches wide and its legs just slipped right in between the feet of the Elfa. Pretty cool trick.

Now you can see all eight of the DVD boxes right at the end of my table where they’re easy to reach. I’m hopeful that my entire stamp collection will fit here. I haven’t decided yet if I’m going to put my unmounted wheel stamps and my large background stamps in here. If I don’t, then these boxes will likely be enough.

IMG_0289

Here’s my CD rack after a few weeks of reorganizing stamps. As you can see, there are a lot of cases missing now. And the ones remaining are getting pretty empty. Many of them are down to just one or two stamps.

IMG_0291

This stack of boxes is full of empty CD cases – over 250 of them! I’m pretty excited to get this process finished. I can see the light at the end of the tunnel now.

IMG_0292

Tuesday, January 10, 2012

Clean and Simple Card Making Class–Day 2

Oh, boy, am I having fun with this class! There are so many great ideas to try out that I can’t wait to play each day. Here are today’s cards.

I always need lots of birthday cards. I’m the hospitality chairperson for one of my daughters’ middle school PTA groups, and I make sure that everyone on the staff gets a handmade birthday card. I’m really enjoying doing this, and the staff is thrilled as well.

For this card, I was using some of Julie Ebersole’s hints about faux letterpress style designs. I love the way it turned out.
IMG_0240
Details: stamps – Harvest Berries, Year of Flowers: Daffodil; cardstock – White; ink – Lucky Limeade (Stampin’ Up), Onyx Black (Versafine)

For this next card, I followed some of Julie’s hints for creating the illusion of an extra layer by masking off the edges of my card as well as the flowers, then adding color to the center. I don’t have any of the mists that Julie uses, so I went back to my early days of stamping and applied ink using a sponge. Not sure how well this particular card works, but the idea is great.
IMG_0239
Details: stamps – Simple Sunflower, Birthday Bash Sentiments; cardstock – Rustic Cream; ink (all Stampin’ Up) – Chocolate Chip, Marigold Morning, Bashful Blue; tools – Simple Sunflower dies

And last of all is this little 4x4 inch thank you card. I was pondering the sketch from Day 1 with the three elements in a row, when I came upon this stamp with three butterflies all on one stamp. Makes the stamping much simpler, and I like the resulting card.
IMG_0238
Details: stamps – Kindness Matters (Stampin’ Up), En Francais (Stampin’ Up), Floral Frenzy; cardstock – Rustic Cream; ink (Stampin’ Up) – Buckaroo Blue, Soft Suede; tools – Chocolate Chip marker (Stampin’ Up)

Monday, January 9, 2012

Clean and Simple Card Making Class–Day 1

cleansimple_participant
I’m really excited today because it was the first day of the Clean and Simple Card Making Class taught by Kristina Werner, Julie Ebersole, and Jennifer McGuire. All three of these ladies’ blogs are way up high on my list of “must reads”, so it’s a no-brainer that I would take the class. There are also a bunch of guest teachers, which include a whole bunch more of my stamping idols.
Here’s the link to the class information - http://www.onlinecardclasses.com/cleansimple/. It’s a real bargain, and all of the class materials will be available forever if you sign up.
Today’s class consisted of a few really nice card sketches, examples, and helpful hints. It took no time at all to come up with this birthday card. Using my newly reorganized stamp storage, it was so easy to find exactly the right flower, flower center, and the perfect sized sentiment.
IMG_0236
Details: stamps  – Beautiful Blooms II (flower and center), Gracious Vases (sentiment); ink (all Stampin’ Up) – real red, pacific point, summer sun; cardstock – Kraft, SU Real Red, generic office store white (yeah, I know – it’s what was plentiful and in my way at the time!)

Saturday, December 31, 2011

Progress report–stamp reorganization

So, I thought you might like a progress report on the big stamp reorganization project. As I showed in my last post, I’m in the process of moving my stamps from CD cases to Tim Holtz unmounted stamp folders. I’ve been at it for two weeks, but we were traveling one of those weeks, so let’s call it a week. I’ve probably spent about 25 hours on the project so far.

Here are the two DVD boxes that I have almost filled with stamps. I’m probably not even halfway done yet. I initially predicted that four of these boxes would hold my entire collection, but I’m now guessing that it will take at least six.

IMG_0229

I’ve done a few big sentiment categories and several image categories. The scariest one to tackle is the flower images. There are just so so many of them! But at least when I finish the flowers, it will put me much closer to the finish line.

Here are the flower folders all laid out on the table. There are 13 of them now, with quite a few more to come.

IMG_0230

As I separate out my sets, I’m really getting a good picture of just how many stamps I have. More than anything else I’ve done, this is bound to help me to be much more frugal with my stamp spending. I’m really loving the stamps in their categories, too. I can see so many possibilities for using things together that I never would have found before.

IMG_0231

Here’s the folder count so far:

Christmas sentiments – 12
Thank You sentiments – 6
Birthday sentiments – 5
Love sentiments – 4
Sympathy sentiments – 2
Handmade sentiments – 2
To/from/invitation/gift sentiments – 1

Flower images – 13
Tree images – 7
Star images – 3
Heart images – 2
Snowflake images – 2

I initially purchased 100 of the stamp folders, and I’ve used nearly 60 of them already. I’m sure there will be more. I’m enjoying the process, and I love the result even more.

Sunday, December 18, 2011

Working toward better stamp organization

Warning – this is going to be a very photo-heavy post.
Like all crafters, I’m constantly rearranging and changing how I store things. My stamps are a prime example. I have a fairly huge amount of stamp sets from a variety of companies, some clear photopolymer, and some rubber mounted on EZ Mount. I currently store them in CD cases. Well, everything is in CD cases unless it won’t fit in CD cases. Here’s my CD rack, which will hold a bit over 500 CD cases. It’s actually completely full – some of the cases are missing in this photo because they’re on my table being “processed” like I’m going to show you below. When I finish this process, this CD rack will go away, back to the garage with all of the other stuff we don’t really need but keep anyway.
IMG_0222
Here’s the blog post from Jennifer that started me down this path. Thanks so much, Jennifer, for posting such a thorough explanation of your process. The difference in my process and Jennifer’s is that I’m actually splitting up my stamp sets. In the past, I’ve had a very-poorly-maintained index book showing stamps by category, and I found that I always turned to that book first when making anything. So I pondered Jennifer’s post and realized that I could use it to combine the category index with the actual stamp storage, saving me the step of going from finding the perfect stamp in the category index and then having to cross-reference and go find the CD case containing that stamp. And this will take much less space than storing all of those CD cases. What a deal!
Here are the Tim Holtz unmounted stamp refill pockets that I’m using. They come five to a package and cost about $2.50 per package. I found the best price at the time I purchased at Scrapbooking Alley, which is part of Ritz Camera, but has lower minimums for free shipping.
IMG_0219
IMG_0218

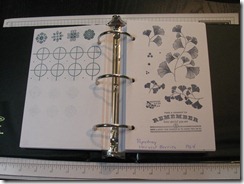
The first part of my system is an index book that has one page per stamp set. Once I separate out all of the stamps, this will be the only reference back to what came with each set, so it’s vital that every set be in the book. Fortunately, I had this book well underway. At the bottom of the page, you can see that I have handwritten the company, set name, and my personal code for that set. My codes are a letter or two for the company, plus a number. I’ll use these numbers when I separate the sets to reference back to this book. The pages of this index are just 5x8 inch index cards, which I’ve hole punched to fit in this little binder that I found at Office Depot.
IMG_0201
Here are some examples of the completed unmounted stamp folders in use. I’ll go over how I created them in a moment.
Here’s a folder with the stamps and index sheet inside. When I take them out of the folder, you can see that I have a sheet of cardstock with the images all stamped on it, with their stamp set codes written under each stamp, and a sheet of acetate holding the actual stamps. To put them into the folder, I lay the cardstock right on top of the stamps and then slide them together into the folder.
Front view of a folder:
IMG_0202
Back view:
IMG_0205
Here are the two sheets removed from the folder:
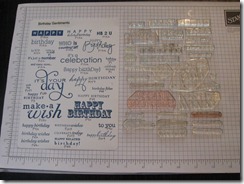
IMG_0204
Some folders contain all clear stamps, some all rubber, and some have a mix of the two.
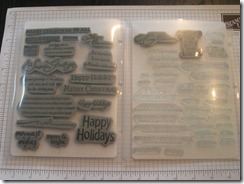
IMG_0223
Some folders contain all sentiments (birthday, Christmas, etc.) and some contain all images (stars, birds, trees, etc.)
IMG_0224
All of those great “back of the card” stamps that I previously had to go hunting for – conveniently together at last.
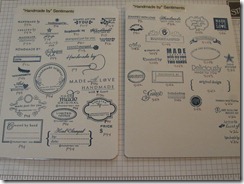
IMG_0225
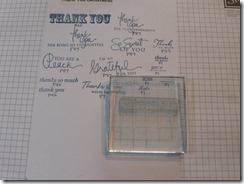
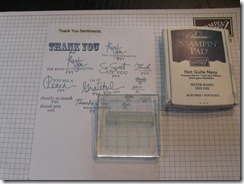
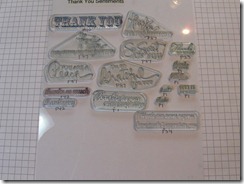
Now for some process pictures. I found a “thank you” sentiment that needs to go into a “thank you sentiments” folder. I take the sheets out of a folder that has room for the stamp. I lay the stamp image down on the cardstock to find it a spot. Then I grab the stamp with an acrylic block and ink it up and stamp it in its spot. Then I clean the stamp, put it right back down on the cardstock in its spot, and use the partially-loaded acetate sheet to pick it up to join the others. Simple!
I do all of my indexing in blue, because it stains the stamps (and me!) less than black. Here I’m using Stampin’ Up’s Not Quite Navy, but I sometimes use other dark blue shades.
IMG_0206IMG_0207
IMG_0208
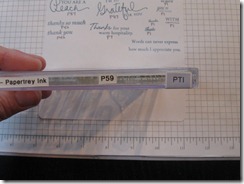
Once I’ve stamped the image on the cardstock, I handwrite the stamp set code underneath it. This is easy to do because my current CD cases have the code on the spine. Having the stamp set code written here will make it easy for me to find the set name for a blog post, or to reassemble the complete set, if I decided to sell the set, for instance.
IMG_0209
IMG_0213IMG_0210
IMG_0212IMG_0211
IMG_0214
The end result is a folder that’s super thin and easy to store. I’ve found that each folder holds anywhere from 30 to 50 stamps, depending on size. The cardstock and acetate are both cut to 6 by 8.5 inches.
IMG_0203
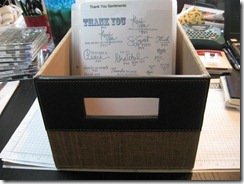
To store the folders, I bought some nice DVD boxes from the Container Store. This box currently has 22 folders in it, and you can see that it’s only about half full. I believe that I can fit my entire stamp collection in four of these boxes. We’ll see if I’m right! My plan is to eventually have the four boxes sitting right on my stamping table where I’ll have every stamp I own in arm’s reach.
IMG_0216IMG_0217
It’s going to take some time to get everything I own into this system, so I’m working on some of the biggest and most rewarding categories first. For me, that incudes birthday, thank you and Christmas sentiments, as well as images of stars, hearts, trees, birds, and butterflies. I find that it’s easiest to focus on just a small handful of categories at a time, or I get too confused and messy with dozens of folders and index sheets in progress at once.
I hope this has been helpful in showing a way to index a ton of stamps in a very small space. I can’t wait until I can say that I have the entire process completed!

Saturday, July 16, 2011

Obsessive compulsive ink indexing project

There has been a lot of discussion lately about which inks are the best match for various Papertrey cardstock colors. I was inspired by this discussion to start finding out which of the suggested colors I might already own, since I've been collecting inks for several years. What I found was kind of shocking:


No ink here.


No way.


Uh uh.


What I found was that my ink pad total is nearly 200! Yikes. But the good part is that I really do have lots of inks to coordinate beautifully with almost all of the Papertrey colors. And many are dead on matches.

I made a set of pages for my notebook showing all of the coordinating inks. These are on Papertrey white cardstock. I made the grid in Microsoft Publisher and filled it in with the inks that I own. I stamped each ink in its spot and then attached a piece of the corresponding cardstock color so that I can see them side by side.

These pages don't even show all of the inks that I own. This spawned a separate project where I made a master page for each color, with every single ink I have on it. The blue page has nearly forty colors on it! I'll have to show those pages in a future post. They're pretty cool, too.